Machine Recycling Discussion and Moderated Newsgroup > Parts Machines
> Diesel Powered
> South
> New
> Polymer rubber stamp machine eu-1218 exposing unit make
Polymer rubber stamp machine eu-1218 exposing unit make
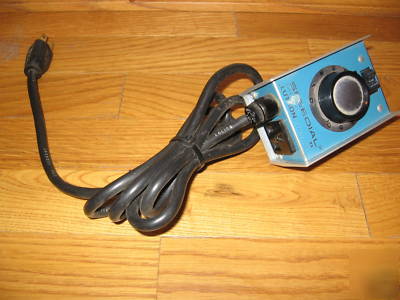
Included is the exposing unit, Model EU-1218 50014-2970-05.
120 Volts, 1.5 Amps, 1 Phase, 60 Hz.
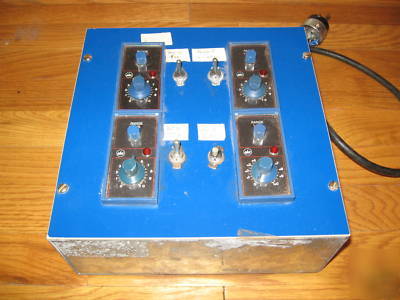
Also included is a Speedial Mark II MOTOR SPEED CONTROL and a timer box with 4 timers for various functions, as well as instructions and part and supply ordering information.
For more information visit the Jackson Marking Products website, rubber-stamp.com
This machine will allow you to start a business making rubber stamps or add to an existing graphics business
The timer is separate, and used to create the negative, stamp & post exposure. (The wash out unit is not included) The timer unit features various settings because the negative, post exposure, & exposing of the stamp all take different times and this way you are not always changing settings. Just flip the switch for the process you are doing. This makes operation simple and easy.
You are sure to be impressed with this machine and the versatile functions it can perform.
Making Stamps the Polymer Plus Way
Set Type and Prepare a Negative
To make a negative with the Polymer Plus Exposure Unit, the original copy must be on vellum paper. The laser printer is used to create the vellum original. Simply insert our laser-printer vellum paper in the paper tray and print!
Put the vellum original in the Polymer Plus Exposure Unit along with a piece of "JMP daylight-safe negative film." After exposure to ultraviolet light for about 40 seconds, the reversing film is sprayed with a water-based developer solution, swished with a soft cotton pad, and rinsed with tap water. Just like that, an exceptionally high quality negative is made.
The negative is placed on a glass plate that is provided with the Polymer Plus Exposure Unit. It is covered with a thin sheet of "cover film" to preserve it for future use. Air pockets that may be trapped between the negative and the cover film are pressed out with a cover-film applicator.
Attach Foam Strips and Pour Resin
The photopolymer "resin" is a thick liquid that has the consistency of honey. It is contained over the negative by the use of "foam strips" with self-adhesive backings. Cut the foam strips to the size of the image area and attach them to the cover film. Then pour the resin over the negative.
A rigid plastic sheet of "substrate" is placed over the resin. The substrate will bond to the photopolymer resin, providing stability for the finished stamp-dies. Another glass plate is put on top of the substrate. Special aluminum clamps hold everything together for the exposure cycles.
Processing with the Polymer Plus Exposure Unit
The glass-plate assembly is inserted into the exposure drawer. "Back exposure" will be the first cycle. These first seconds of exposure to ultraviolet light will bond the substrate to the polymer resin. Then the glass plates are turned over and cycled for "face exposure." It is during face exposure that ultraviolet light penetrates the transparent portions of the negative and the stamp-printing characters are created.
Manual Washout and Post-exposure
Polymer resin that has been covered by the opaque portions of the negative is still in liquid form while the exposed portions are now solid. The liquid resin is washed away with warm water and a mild detergent. A final "post exposure" step hardens the stamp-printing characters, preserving their fine detail. Post-exposure is accomplished by submerging the stamp-die under water in the Polymer Plus Exposure Unit's exposure pan and cycling for another few minutes. When the stamp-die has dried, a fine layer of powder is applied to remove any tackiness. After some practice, the entire process of negative production, pouring resin, exposure cycles, and washout requires only about 15 minutes. Or...try one of our new POLYSONIC Ultrasonic Washout Units!
Assembling the Finished Products
Now the individual stamp-printing dies are cut apart with a pair of scissors and "mounted." Mounting is the process of attaching the dies to traditional mounts and handles or convenient self-inking frames, and can be completed in just minutes. Regardless of the style of mount that you use, the final step is to stamp an image on a piece of indexing stock and attach it to the mounts for quick and easy identification.
This is a great deal on a machine that will serve you well for years to come!!