Machine Recycling Discussion and Moderated Newsgroup > Full Machines
> Complete Machines
> Metalworking
> South
> Tilt top powerbench. panel saw tablesaw jointer
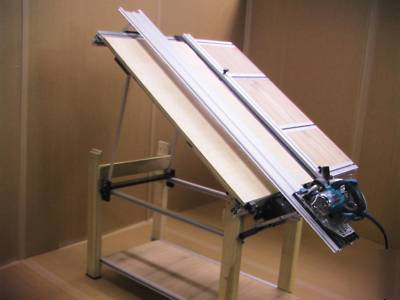
Tilt top powerbench. panel saw tablesaw jointer
A Radial Arm Saw with 49-1/2" capacity.
A Sliding Miter Saw with no limits on miters and bevels.
A Tablesaw with no kickbacks and accidents.
A Panel Saw that can cut in angles. (tapered cuts)
A Beam saw that fits and rolls out of your garage.
A Routing System that works like a "manual" CNC.
A Smart Jointer that gets the job done with one pass.
A Workbench that extends as needed.
The EZ Tilt -Power Bench-Bridge system by Eurekazone.
The B-300. Note that the Bridge is installed even with the sub-top.
In order for the hinges to operate easily and for the guide rail to provide more clamping pressure,
we have to install the Bridge at least 1/4" to 3/4" bellow the top surface of the powerbench.
Better to use a large washer and a nut.
If we have to remove, reset the bridge, it can be done without the initial setting steps.
Simply align the large connector to the line. You make your own lines after the initial setup.
We can have multiple lines for multiple setting locations but the best way is to find the
ultimate location and have only one reference point and only one cutting line.
P.5. On tilting position, we need to install a bumper stop.
( if you make your own tilting top, call us for the free special screws and washers)
Attached ThumbnailsClick image for larger version
ID: 552 Click image for larger version
ID: 553 Click image for larger version
ID: 554 Click image for larger version
ID: 555 Click image for larger version
ID: 556 The depth cut capacity of the B-300 is 7".
The following pictures shown the B-300 raised to work with materials
from 3-1/2" to 7" without the need to adjust for cuts between 3-1/2" to 7" deep.
When we use the B-300 in the upper level, we must make sure that the Bridge is square for 90 degree cuts.
http://tracksawforum.com/showthread.php?t=221
Because the Bridge was designed to tilt for bevel/compound cuts,
if we don't set the bridge straight with a square...we will get bevel cuts instead. Attached ThumbnailsClick image for larger version
ID: 557 Click image for larger version
ID: 558 Click image for larger version
ID: 559 Click image for larger version
For one or two bevel cuts, better to tilt the saw.
BUT, if we need more depth and very accurate bevel cuts or high production accurate work,
the ez solution is to tilt the bridge instead of the saw.
Perfect cuts every time but not without the hassle of resetting the bridge.
I will post a picture this week of the first setup.
On the following pictures we removed a section from the 4"x4" and put the section back again.
The piece marked X, was removed with 2 simple and very safe cuts.
The idea is to keep everything stable and eliminate any flex due to the circular saw construction. Attached ThumbnailsClick image for larger version
ID: 561 Click image for larger version
ID: 562 Click image for larger version
ID: 563 Click image for larger version
ID: 564 Click image for larger version
ID: 565 Trying to think. Why we need Bridges?
Picture #1. Just playing around with the possibilities. Endless and ez.
P. #2 & #3. The complete ez shop.
We can use All tools, saw-router-planer, on the SPB, the tracks without the bench and free handed.
P #4. The SSRK setup. For better results, more stability,
we can use a piece of scrap ( same thickness )between the rip fence and the wood.
The rip fence was out of the design, but after many cuts and until we can invent a smarter fence,
this simple rip fence is back for now and included on the fully loaded SPB.
Free to some smart guys who trusted eurekazone and ordered the SPB without all the details and the rip fence.
P#3. The second locking knob on the rip fence is moved to the third SME withing reach from the front.
The simple designed rip fence allows the use of the squaring stops and rip fence at the same time.
P#5. One way to extend the plywood top for better material support.
The best way is not to move the top and have only one cut on it.
We can easily make supporting tables with two ez connectors and few scraps.
http://tracksawforum.com/showthread.php?t=36
Thanks guys. Attached ThumbnailsClick image for larger version
ID: 566 Click image for larger version
ID: 567 Click image for larger version
ID: 568 Click image for larger version
ID: 569 Click image for larger version
Why we need rocket launchers? Attached ThumbnailsClick image for larger version
ID: 571 Click image for larger version
ID: 572 Click image for larger version
ID: 573 Click image for larger version
ID: 574 Click image for larger version
Why build $25.000.00 sliding tablesaws when you can let gravity
do all the work? Attached ThumbnailsClick image for larger version
ID: 576 Click image for larger version
ID: 577 Click image for larger version
ID: 578 Click image for larger version
Here is Peter reaching 51" without an appointment with his chiropractor.
P.S. It looks harder to reach because the saw wasn't cutting the plywood.
In normal cutting mode, the handle of the saw is much lower and we don't have to apply
down and forward forces the same time. Only forward pressure without twisting our risks.
We can use our left and right hand and we can make the cut from both sides of the bridge.
Freedom of movement= better ergonomics= less energy= safety= ezsmart.
This is the main reason that we don't like to use or recommend plunge saws.
Imagine trying to cross cut a 48" panel while trying to keep the saw from jumping off the rails?
ID: 580 Click image for larger version
ID: 581 Click image for larger version
ID: 582 Click image for larger version
ID: 583 Click image for larger version